
The first tab of the User Settings dialog contains general settings. Here you indicate your time zone, input your e-mail address, change the password to enter the system, and set many other parameters.
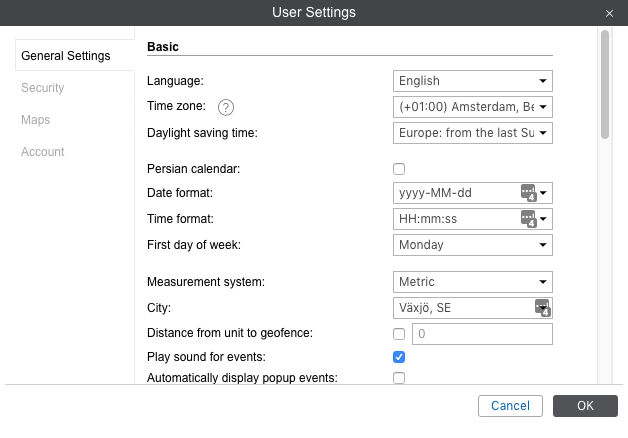
Language
The language menu. Contact your service administrator to expand the list of available languages.
Time zone
The choice of time zone influences the time parameters that are displayed in all dialogs and panels.
Daylight saving time
Specify DST options if you use summer and winter time in your region — choose the most appropriate DST schedule on the dropdown list. None — summer time is not used.
Persian calendar
This option allows to activate the Iranian calendar also known as Persian solar calendar. It is used in Iran and Afghanistan. If the option is chosen, the Persian calendar replaces the usual (Gregorian) calendar in the places where a user should indicate some time interval (to build a track, to query messages or a report, to setup a job or assign a route, etc.) Note that the Persian calendar can be used to indicate particular dates of an interval only (from – to). Working with quick intervals (Today, Yesterday, Week, Month, Year), the Gregorian calendar is applied. If the interface is in Arabic, the calendar is in Farsi (language spoken in Iran) and is shown from right to left. Otherwise, it is in English (in Latin characters and Arabic numbers) and is shown from left to right (see details). Enabling/disabling the Persian calendar requires reloading the page.
Date and time format
Select the format of the date and time that is convenient for you. Depending on the entered mask, the date elements can be arranged in different order and have a different appearance. A month, for example, can be displayed with a word or a number, a year with two or four digits, and so on. In addition, the day can also be included. The syntax instructions for each field are given in a tooltip. In the drop-down list, you can select one of the predefined masks. The table below shows some examples of formats:
| Date mask | Time mask | Result 1 | Result 2 |
|---|---|---|---|
| yyyy-MM-dd | HH:mm:ss | 2014-01-25 09:45:33 | 1987-12-02 17:20:00 |
| d/MM/yy | HH:mm | 25/01/14 09:45 | 2/12/87 17:20 |
| d MMMM yyyy dddd | hh:mm:ss tt | 25 January 2014 Saturday 09:45:33 am | 2 December 1987 Wednesday 05:20:00 pm |
| dd MMM yyyy ddd | hh:mm tt | 25 Jan 2014 Sat 09:45 am | 02 Dec 1987 Wed 05:20 pm |
First day of week
Select either Monday or Sunday as the first day of the week. This affects the appearance of the calendar and the manner of counting weeks in general.
Measurement system
Select one of the available measurement systems. The corresponding units of measurement are used in such tools as Distance, Area, Routing, Nearest Units. The measurement system also influences address processing, as well as the creation of routes. However, the earlier created units and resources (together with geofences, jobs, and notifications) possess the measurement system selected upon their creation. As for reports, their measurement system is set separately (see Report settings –> General).
City
In this field you can indicate your city. It is used in the Nearest Units and Address tools as the default city. Enter the name of the city. When you enter the first letters, the dropdown menu with the names corresponding to the request opens automatically. You can either continue typing in the name or choose it from the dropdown menu (there can be several cities with the same names in different countries).
In addition, this setting determines the position of the map when entering the monitoring system. However, if there are monitored units on the map, the map is scaled so that all of them are in sight.
Distance from unit to geofence
This option activates the calculation of the distance from a unit to a geofence when using the latter as the address. The maximum allowable value is 100 km or miles (depending on the selected system of measures).
![]() To work with this option, activate the Geofences service in the account properties.
To work with this option, activate the Geofences service in the account properties.
Play sound for events
A sound can be played when an online notification is triggered or a driver’s message is received. In Windows OS, QuickTime Alternative can be used as media player. If you use Opera, you may need additional adjusting, so that the request to play or save the sound does not appear.
Automatically display popup events
If you want the online notifications and messages from drivers to be automatically shown on the display, it is necessary to check this box. If you remove the check mark, only a number in the red circle in the bottom panel of the program near the corresponding icon indicates that new events have been received.
![]() If you close the online notifications window or the chat with driver window using the cross in the upper right corner,the Automatically display popup eventsbox will uncheck. The box can be checked again either in the user settings window or by clicking on the Online notifications or Chat with drivers buttons in the bottom panel.
If you close the online notifications window or the chat with driver window using the cross in the upper right corner,the Automatically display popup eventsbox will uncheck. The box can be checked again either in the user settings window or by clicking on the Online notifications or Chat with drivers buttons in the bottom panel.
Use keyboard shortcuts
Check this box to activate the Shortcuts.
Infinite map
Allows the circular (infinite) movement of the map to the right or left. This option should be activated only when tracking is carried out around the 180th longitude (Fiji, Chukotka, etc.).
Driver’s activity
Check this boxto show the information on driver’s activity in the unit and driver tooltips, as well as in the extended unit information.
Render charts on server
Check this box to use the static charts in the monitoring system.
Show Additional Information about the Unit
Here you can choose what additional information about the unit should be displayed in different places of the tracking system.
If you check the boxes in the left column, the information will be shown in the unit tooltip (displayed as you hover the mouse pointer over the unit’s icon).
If you check the boxes in the right column, the information will be shown in the extended unit information in the work list.
To check all the items from any column, hold the Ctrl key on the keyboard and check any box of the corresponding column.
Last message
The time when the last message was received and how long ago.
Location
The last detected address.
Presence in geofences
If a unit in the latest message was within a certain geofence, the name of the geofence is displayed in the unit tooltip and in the extended unit information with sorting by area (from small to large), and it has the color that is assigned in geofence properties. This option also affects units count in the Geofences panel.
Speed
The speed in the latest positional message.
Altitude
The altitude in the latest positional message (if device is able to give such data).
Counters
The values of mileage counter and engine hours counter. See Counters.
Satellites
The number of satellites captured in the latest positional message.
Coordinates
GPS coordinates of the unit, taken from the latest positional message received (in decimal degrees).
Connectivity settings
Device type, unique ID(s), and phone number(s) specified in unit properties. This information is available to users with ‘Edit connectivity settings’ access flag.
Sensors values
Sensors configured for the unit and their known values will be listed. Custom sensor name is displayed and the value processed according to calculation table of this sensor.
Parameters
The latest known parameters. Their names and values match those of the messages without conversion to other units.
Drivers
The name, photo, and phone number of the driver(s) currently bound to the unit.
Trailers
the name and photo (if available) of the trailer(s) currently bound to the unit.
Custom fields
Custom fields from the properties of the unit (general or/and admin fields depending on access).
Profile
Profile information of the unit.
Maintenance state
Specified service intervals and terms for their implementation (days/engine hours/kilometers left or expired).
![]() Note.
Note.
The counters are refreshed once a minute, as well as the information about drivers and trailers. Check for presence in geofences is performed every two minutes. Other information is refreshed instantly.
Unit Visualization on Map
Replace unit icons with motion state signs
When the box is checked, all icons of the units are replaced by conventional signs showing their activity. The green arrow indicates that the unit is moving, and its direction shows — which way. The yellow circle means that the unit is standing with the engine running, the red square — that the unit is standing with the engine off. See Unit presentation on map.
Display overlapping units in one icon
![]() If two or more units are overlapping, their icons are grouped into the common one. It facilitates the visual perception of the map. The common icon has a value indicator showing a number of units in it. To see the list of units the common icon contains, hover your mouse cursor over the icon for a pop-up window to appear. Upon clicking the common icon the map is scaled in such a way that all the units of the common icon get into the vision field. Note that overlaying icons cannot be grouped into the common one on the 2 largest scales. When you view the map on such a scale, accuracy is important, so all the icons are visible, regardless of their overlapping.
If two or more units are overlapping, their icons are grouped into the common one. It facilitates the visual perception of the map. The common icon has a value indicator showing a number of units in it. To see the list of units the common icon contains, hover your mouse cursor over the icon for a pop-up window to appear. Upon clicking the common icon the map is scaled in such a way that all the units of the common icon get into the vision field. Note that overlaying icons cannot be grouped into the common one on the 2 largest scales. When you view the map on such a scale, accuracy is important, so all the icons are visible, regardless of their overlapping.
Show unit icons at map borders
If a unit is outside the visible area, its iconis displayed at the map border in the direction where the unit is located. Click on this icon to see this unit on the map.
Blur icons of inactive units
Indicate this flag in order to differentiate unit states on the map.
Trace
It is possible to indicate the length of the trace which is added to a moving unit on the map (the Points in traces parameter), and select the color and width for it.
Multicolor sensors in unit tooltip
Sensors, if chosen to be displayed in the unit tooltip, can change their colors according to the received values. The color scheme can be adjusted on the first tab of sensor’s properties. In the unit tooltip, the color can be applied either to the whole row with the sensor (both its name and value) or only to its value — select the desired option in the dropdown list. If Multicolor sensors in unit’s tooltip is disabled, the default color (black) is used.
Other Items on Map
Display names of routes’ check points on map
Depending on the checkbox, route check points can be displayed with or without their names on the map.
Display names of geofences on map
Depending on this checkbox, geofences can be displayed on the map with their names or without them. The color of the captions is adjusted in geofence properties.
Display overlapping geofences in one icon
![]() If several icons of geofences overlap when displayed on the map, they can be grouped into one. Place the cursor over this icon to know what geofences are hidden behind it. Note that for reports this option is set independently — in the advanced options of a report template.
If several icons of geofences overlap when displayed on the map, they can be grouped into one. Place the cursor over this icon to know what geofences are hidden behind it. Note that for reports this option is set independently — in the advanced options of a report template.
Render geofences on server
By default, all geofences are rendered in the browser. Rendering on the server is advisable, if not a very powerful computer is used for monitoring, but the speed of Internet connection is quite high. In such cases, this option allows you to significantly increase the performance of the MiniFinder GO system.