
To build a track in the Tracks panel, do the following:
-
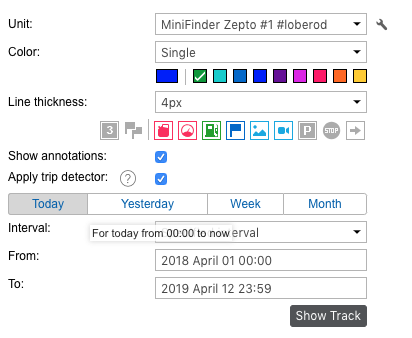
- Select a unit in the dropdown list. Its contents depend on the work list in the Monitoring panel and access to the units. In case the work list is empty (when the dynamic work list is used or when units were deleted from the work list manually), the units to which you possess the corresponding rights will be displayed.
-
- Adjust the desired parameters for the track (color, thickness, etc.).
-
- Define the time interval within which you want to get the data.
- After filling in all the fields, press Show Track.
![]() To display the tracks on the map, the corresponding layer must be activated.
To display the tracks on the map, the corresponding layer must be activated.
The principle of interval adjustment is the same as in the reports (see Query and View Reports). The third and fourth steps can be combined into one if you use one of the quick intervals (the buttons Today, Yesterday, Week, and Month).
A point-to-point track built according to preset parameters will appear on the map (if the unit has any messages with coordinates for the period). If it takes too long for the track to appear on the map, it means you either indicated an interval that is too long or your Internet speed is too low.
If within the indicated period the unit was not moving, there will be no track on the map. However, it will be in the list of tracks below, and the distance traveled will be 0 km.
A track or its part can be displayed on the map as a dashed line. Such situation indicates that the data on this part of the track might be inaccurate. For instance, the maximum interval between messages is exceeded (see the Advanced tab) or the number of satellites is less than 4 (if the validity filtration of messages is disabled).

Alternative methods to build a track on the map are:
-
- In the Monitoring panel with the help of quick track buttons.
-
- In the Messages panel when you view data messages.
- In the Reports panel, if the appropriate option is selected in the report template.