
![]() It is not possible to generate a report if no templates have been created in advance.
It is not possible to generate a report if no templates have been created in advance.
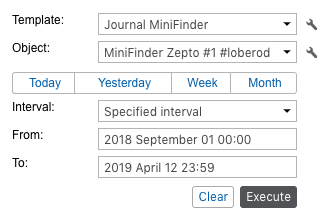
To generate a report, set its parameters (template, object, time interval) and click Execute.
Template
Select the required report template from the drop-down list. By default, the one that was created and edited last within the current session is selected. To the right of the list is the button for editing the properties of the selected template ![]() ).
).
Object
Select the system object that you want to execute the report on (the current user should have the Query messages or reports access right). Depending on the report type specified in the template, you can select a unit, unit group, user, driver, trailer, route, resource, retranslator, group of drivers or trailers, passenger or group of passengers. For the Unit group report type, you can specify more than one object. Click the Add object button ![]() and in the drop-down list, select the required unit or unit group (shown in square brackets). If specific objects are bound to the template, only they will be available in the drop-down list. To view/edit the properties of the selected system object, click the button in the form of a wrench to the right of it.
and in the drop-down list, select the required unit or unit group (shown in square brackets). If specific objects are bound to the template, only they will be available in the drop-down list. To view/edit the properties of the selected system object, click the button in the form of a wrench to the right of it.
![]() If the report type is Unit, only those objects that are currently in the Monitoring panel work list (and not all the objects to which you have the required access) are included in the drop-down list. In case the work list is empty (when the dynamic work list is used or when units were deleted from the work list manually), the units to which you have the Query messages or reports access right will be displayed.
If the report type is Unit, only those objects that are currently in the Monitoring panel work list (and not all the objects to which you have the required access) are included in the drop-down list. In case the work list is empty (when the dynamic work list is used or when units were deleted from the work list manually), the units to which you have the Query messages or reports access right will be displayed.
Interval
The report execution interval can be specified in two ways: manually or with the help of one of the available pre-set intervals.
Use buttons Today, Yesterday, Week, Month to select a pre-set interval. If you press one of those four quick buttons, the report launches immediately (there is no need to press Execute).
![]() If the Week interval is selected, the report is executed for the last full week, that is, for the previous week from Monday to Sunday. The Month interval works in the same way.
If the Week interval is selected, the report is executed for the last full week, that is, for the previous week from Monday to Sunday. The Month interval works in the same way.
To select the interval manually, there are several options (the drop-down list to the right of the Interval field):
-
- Specified interval
For such an interval you can specify the date and time of the beginning and end (to minutes).
- Specified interval
-
- Starts ‘From’ until today
Specify the exact start time. The current time will be automatically set as the end of the interval.
- Starts ‘From’ until today
- For previous
The number and the time interval (minutes/hours/days/weeks/months/years) for such an interval are indicated below. To select a numerical value for the interval, use the arrow keys or the mouse wheel. Valid values are from 1 to 99. Press and hold the arrows to rewind at an increased speed. When the Include current option is activated, the report is executed not for the last full period, but for the current one.
![]() When choosing an interval, note that the number of lines of the generated report is limited to 100 000 for optimal system performance.
When choosing an interval, note that the number of lines of the generated report is limited to 100 000 for optimal system performance.
There are alternative ways to receive reports in the monitoring system:
-
- receive reports by e-mail at the specified time (adjusted through jobs);
-
- receive a report when an event happens (adjusted through notifications);
- quick report generation from the monitoring panel.