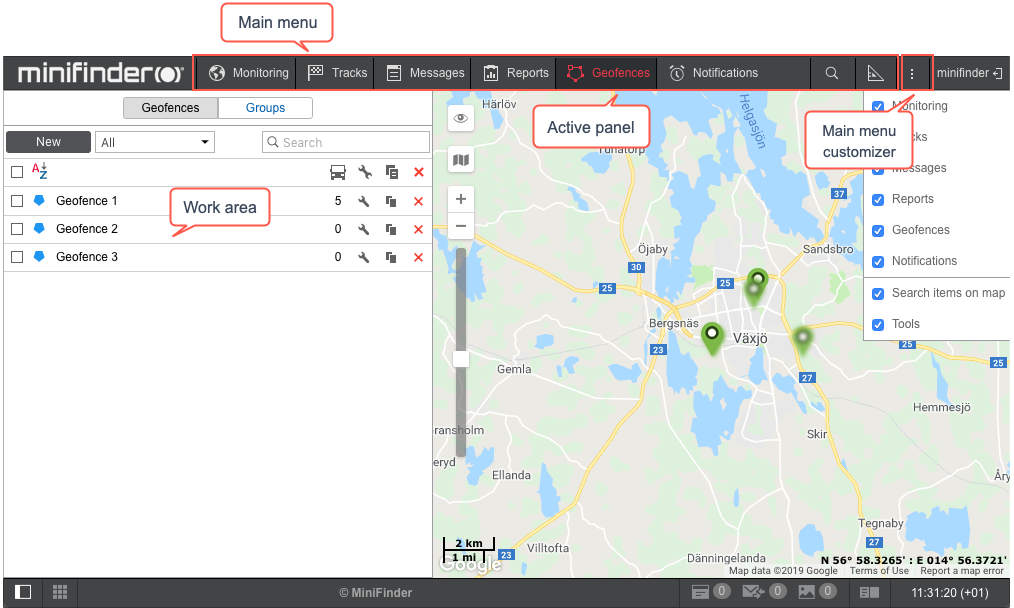
In the left part of the screen there is a work area in which various actions with different elements of the system are performed, as well as various requests are formed.
Depending on the tag chosen in the top menu, one of the following panels can be opened in the work area:
![]() Monitoring — tracking units position, state and movements.
Monitoring — tracking units position, state and movements.
![]() Tracks — viewing movement history.
Tracks — viewing movement history.
![]() Messages — viewing the messages that come from the units.
Messages — viewing the messages that come from the units.
![]() Reports — wide range of survey instruments and sorting of data received from a unit.
Reports — wide range of survey instruments and sorting of data received from a unit.
![]() Geofences — creating, editing, removing geographical areas.
Geofences — creating, editing, removing geographical areas.
![]() Routes — creating and monitoring the traffic route of a unit according to its schedule.
Routes — creating and monitoring the traffic route of a unit according to its schedule.
![]() Drivers — creating drivers and assigning them to units.
Drivers — creating drivers and assigning them to units.
![]() Trailers — creating trailers and binding them to units.
Trailers — creating trailers and binding them to units.
![]() Passengers — creating passengers and binding them to units.
Passengers — creating passengers and binding them to units.
![]() Jobs — creating, editing, removing jobs performed on schedule.
Jobs — creating, editing, removing jobs performed on schedule.
![]() Notifications — creating, editing and removing notifications of events.
Notifications — creating, editing and removing notifications of events.
![]() Users — managing other users.
Users — managing other users.
![]() Units — managing available units.
Units — managing available units.
Top menu also can include two panels which are not shown in the work area. They have their separate windows. They are:
![]() Search on Map — dynamic search of system’s micro objects on the map;
Search on Map — dynamic search of system’s micro objects on the map;
![]() Tools — tools for calculation distance and area, laying the best routes, searching for the nearest units, etc.
Tools — tools for calculation distance and area, laying the best routes, searching for the nearest units, etc.
![]() Apps — applications that solve various user’s tasks.
Apps — applications that solve various user’s tasks.
The width of the work area can be changed. To do this, click on its right border and drag it to the required direction, holding the mouse button. Moreover, you can hid the work area by pressing the button located in the lower left corner ![]() .
.
Main Menu Adjustment and Navigation
To adjust the main menu click the customizer icon ![]() and select the menu items to work with. The selected items immediately appear in the top menu.
and select the menu items to work with. The selected items immediately appear in the top menu.
The panel that is currently open is highlighted with a darker background. To navigate through the menu, you just need to click on the required name. The contents of the left panel (the work area) changes automatically.
![]() Keyboard shortcuts are used to facilitate navigation through the panels.
Keyboard shortcuts are used to facilitate navigation through the panels.

All the range of items chosen for the main menu is displayed at the top. The names of the panels are shortened if there is a lack of space. That is why you should choose only those items that you actually use.
Alternative Means of Navigation
If the browser window is small, but there are a lot of panels selected, inscriptions generally become not visible, and menu panels are presented just with icons. In such cases clicking on the icon mostly leads to switching on/off the layer on the map. Therefore, in such cases to switch the panels you should additionally hold the Ctrl key.
Another means of navigation is through the menu settings window. If you click on the name of any item in the settings window, you will be taken to the corresponding panel. In this case, if before it was not displayed in the menu, it appears. Also, do not forget that when you call the panel from the menu settings window the layer is activated automatically.
The same occurs in case of forced transitions between panels, for example, when requesting a report from the monitoring panel or during transition from reports to messages. Even if the requested panel is not displayed in the main menu, the transition is successful. In this case the corresponding item is added to the menu and the layer becomes active.
